

How To Make An Email Blast In Photoshop
Make an eBlast Promotion with Photoshop and HTML/CSS
Like many designers, I work on a wide variety of projects, from websites and brochures, to ads and emails. Recently, a client's book was getting cracking reviews and they wanted send out an eBlast promotion through a third party. Due tomorrow. So I needed to design, markup, and test the eBlast equally rapidly as possible.
This article outlines the process I used for the eBlast, and it assumes:
• You're pretty comfortable in Adobe Photoshop, y'all know how to use layers and guides, the Eyedropper Tool, Relieve for Web and Devices
• You know basic HTML and CSS and have an HTML editor, such every bit Coda, Dreamweaver, TextWrangler or BBEdit for markup
• Y'all have admission to a web server and can upload files and images
one. First upwards, Planning
Read the publication'southward specs advisedly
When you're working with a tight schedule it's tempting to dive in and starting time working. But on quick jobs, there's no fourth dimension to redo annihilation.
For the sample projection the publication specified, among other things:
• using a unmarried JPG for the eBlast is not allowed
• maximum file size 75k or 100k
• no CSS in the header
• may not reference a remote CSS file
• images must be hosted on the advertiser'southward server
• maximum width 728px
• maximum prototype size 300px x 600px
The easiest solution would be making a unmarried JPG image for the eBlast, but the publication didn't let this. Like shooting fish in a barrel solution number two, using an existing template, didn't pan out either. All my templates had CSS in the header, again, not allowed. That leaves creating an HTML eBlast with inline CSS styles.
Cull your tools
Quondam-school HTML layouts in tables are rendered pretty consistently in electronic mail clients. Photoshop outputs HTML tables and images slices, using the "Relieve for Web and Devices" control, then information technology is a skilful layout tool for this eBlast project. The HTML tin can be opened in an editor for final markup.
Decide how to speed the process.
Tin can some tasks exist done concurrently?
There are probably a few labor-intensive elements in your project. In the sample project, the artwork features detailed cut-paper illustrations that require meticulous silhouetting. I didn't take fourth dimension to do this for each design iteration, so I asked the client to trust, based on past projects, that I would silo the art properly. Likewise washed meantime: online testing and proofreading. Once the layout is approved, any text changes are unlikely to bear upon the overall appearance and part of the HTML markup.
What features are non admittedly necessary and could exist scrapped if time runs out?
In the sample projection nosotros saved responsive conversion for last. We felt nigh people will exist reading this eBlast at piece of work on their computers, the layout would be pretty uncomplicated and assuming with lilliputian text, and it would feature stiff images that will be distinguishable on a pocket-size cell phone screen. So converting the HTML to a responsive layout was a "we'll do it if we accept time" task.
Decide where the images and the online version will be hosted
If the images will be saved to client's server and served to the e-mail customer from there, get necessary logins. For the sample project, I hosted the images on my web server. Either manner, to test the eBlast, it volition need to exist uploaded to a web server. Create a binder for your project within your local website folder.
2. Make the Photoshop Layout
Layout to fit the table
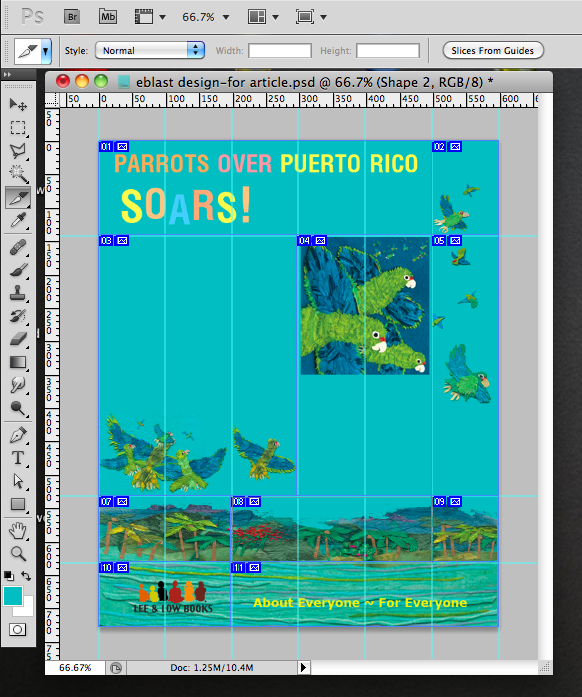
For the sample layout, I created an RGB Photoshop certificate 600px wide, planning a half dozen-column table of 100px per column. Using the colspan attribute I could set cell widths from 100 to 600 to work with for layout diverseness. Pull out vertical guides to bespeak the maximum number of columns y'all expect your table rows to have.

Now design your eBlast, keeping the table in mind. Each table row has to have a total of half dozen columns. For case, in the kickoff row, the headline spans 5 columns, a bird image fits into 1. 5+1= 6. In the next row has text and fine art spanning three columns, art and book specs spanning 2 columns, art spanning 1 column. three+two+1=6.
Before finalizing the layout, set horizontal guides where you expected rows to exist.

When your layout is approved, its time to make the images and the HTML.
Set to consign the HTML and Images
Determine which text is all-time as HTML and which is best as JPGs
Some people may view the eBlast with paradigm viewing turned off, and then all text as images will be readable only if the alt tag is filled in. Nevertheless, in that location are mode limitations to alive text in email clients. For the sample project, we kept the headline treatment and client tagline as JPGs, and programme to put the text in the alt tag. The starred reviews and volume information volition exist live text and so they are readable without images on, and they can be typeset with the e-mail client's default san-serif font without much pattern degradation. (Arial haters may need to take a deep jiff hither.)
Hide the Photoshop layers with the live text.

Note Styles and Colors
To brand markup easier, take some notes at present almost the parts of your layout that will be specified in CSS and HTML. Use the eyedropper tool to sample and make a note of the colors you lot'll exist using for the groundwork of whatsoever text cells, as well as the colors of text or any other HTML elements y'all plan to use, such as borders or horizontal rules. If you cut and paste the hexadecimal values (half dozen digits in the # field) into a bare document in your HTML editor you'll accept them for later use.

Measure the distance between live text and your column guides, so you'll know what the cellpadding should be, and make any other notes well-nigh your layout that will be helpful after, such as font sizes. You can always become back to the Photoshop layout, but you'll markup faster if you're non switching dorsum and along while writing CSS styles.
Slicing Your Layout for the Table
Using the Slice tool, manually set slices and then you can control colspans. Drag diagonally with the pocketknife tool from guide to guide to ascertain your jail cell as a slice.

Export with "Salvage for Web & Devices"
Select "Salvage for Spider web & Devices" under the File Carte du jour
Bank check that your slices look right, using the Toggle Slices Visibility Button.

In the Relieve for Web dialog box, choose:
Format: HTML and Images
Settings: Default settings (background images are non well supported in email clients)
Slices: All User Slices
Select the project's folder in your website's local binder (the one yous made in the planning stage).
Photoshop will automatically create an HTML document, and brand a JPG of each of your slices. The JPGs will have your document name plus an incremental number, and exist in a folder labeled "images."
3. Adjust tables in an HTML editor
Open the HTML from Photoshop in your HTML editor. Add together a 2px border to the table to see your table cells clearly in preview mode. You'll take this out later as it is really, really ugly.

If the table construction is non as you expected, information technology could exist faster to redo your slices in Photoshop and Save for Web & Devices again. And even if the table looks pretty good, you'll probably withal demand to do some clean up. Fix any images that don't fit quite right. If they're about the right size, you lot can adapt the summit or width in the img tag with minimal distortion. Notation: during testing images that were exactly the width of the combined columns sometimes caused misalignment of the table. Making images just one pixel less broad (499px instead of 500px) solved the problem with no visible spaces.
Add a background colour to the cells where y'all will have live text using bgcolor in the tabular array, or td tags and the notes you took while preparing to consign from Photoshop. Add a background color to the body tag, if desired.

Crop and add images that volition be below or above your text
In the sample project, there are birds below the starred review text. Photoshop makes an image the size of the whole cell.
Open this paradigm and crop it and so there's room for the text. Since the birds are silhouetted on the aforementioned color equally the tabular array background, the birds volition announced seamlessly on the groundwork with the text.
Add alive text
Add together text "View this on the web." above your table. This will be a link to the file a web server. The destination <a href="#"> can be blank for now. You can put in the static URL when you've uploaded the file.
Copy and paste text from your Photoshop layout into the appropriate prison cell. Get back and forth between the preview with the ugly borders and the HTML to confirm you've pasted the text into the correct place if necessary.
Add "Please do not respond to this electronic mail, it is from an unmonitored electronic mail address" with opt out information and a link beneath the table.
Fashion your text. The sample projection uses inline CSS to suit to the publisher'south specifications. (Run across Iii Ways to Insert CSS at W3schools.com)
Change the tabular array border dorsum to "0."
iv. Send for Review
Upload the HTML and images to your server
Supersede all image links with absolute URLs: "https://www.yourserver.com/clientfolder/images/eblast-design_11.jpg" so that they can be served when the eBlast is opened. If your spider web-editing software doesn't track versions for y'all, be sure to do this both in the HTML on your hard drive and the HTML on the web server so the editions are in sync.
Add together the static link to your eBlast to the link for "View this on the spider web." It might seem weird to add together a link to an HTML document into the HTML certificate, just information technology volition exist needed when you send the page to be reviewed in an e-mail client.
Send the eBlast as an e-mail
View your eBlast HTML in Safari. If you don't use Safari, in that location are add together-ons available for Firefox, Internet Explorer, and Chrome that will allow you to email a page.
Under the file menu, select "Postal service Contents of this page" or control+I

5. Testing
It's always best to test in as many actual environments every bit you can. In this fourth dimension frame, we tested in available email clients and used an online testing service, emailonacid.com. In addition to previews in multiple desktop and mobile environments, they have FAQs, plus support and community threads for troubleshooting.

Issues in the sample project
Adding a 1px-alpine fifth row with width specified in pixels for all 6 columns helped the table to hold together in some electronic mail clients (I'm talking to yous, Windows Mail). Specifying what I didn't desire was equally important equally specifying what I did want. For spider web design projects, I use the Meyer Reset in my CSS. Here, that was not possible since I could accept no CSS in the caput of my document. So
I had to specify things like style="border:0;" for the logo and manner="list-way:none;" for the awards.
In some tests, HTML entities, similar "&rquo" for right quotes, displayed as junk characters if the viewer had called a font for email viewing that didn't have a large graphic symbol set. The entity number might have worked, only we chose to substitute mutual characters—inch marks instead of curly quotes for instance—just to be on the condom side.
6. Finishing upwardly
When the eBlast tests results are satisfactory, send the HTML to the client. Go out the HTML and images in place on the web server. The images will be called by email clients when your eBlast is viewed. Leave the HTML in place so the eBlast tin can be viewed on the on the web if needed.
The final event is here: Parrots over Puerto Rico eBlast sample projection.
Cheers to Lee & Low Books for graciously allowing the use of their eBlast for the sample projection. Thanks also to Brian Maya for help with the eBlast and the commodity.
Source: https://creativepro.com/make-eblast-promotion-with-photoshop-and-htmlcss/
Posted by: hannahexis1960.blogspot.com
0 Response to "How To Make An Email Blast In Photoshop"
Post a Comment