

How To Copy A Selected Area In Photoshop
There are many methods you tin can use to copy and paste layers, selections, and other elements of your project in Photoshop. The methods don't require besides many steps and are pretty intuitive. And then whether yous want to copy and paste layers, layer styles, aligning layers, or Camera Raw settings, this mail service has y'all covered.
How To Copy & Paste Layers
To re-create and paste layers in Photoshop, click on a layer you'd like to re-create. If yous desire to copy multiple layers, hold Command (Mac) or Control (PC) and click betwixt your desired layers. Now go to Edit > Re-create to copy your layer(south). To paste your layers in a new location, go to Edit > Paste.
Now, this is essentially the aforementioned action every bit duplicating a layer if you desire to paste that layer within the aforementioned project. In that instance, there'south a slightly easier method to endeavor which duplicates your selected layers inside a project.
To do this, kickoff head to the layers panel.
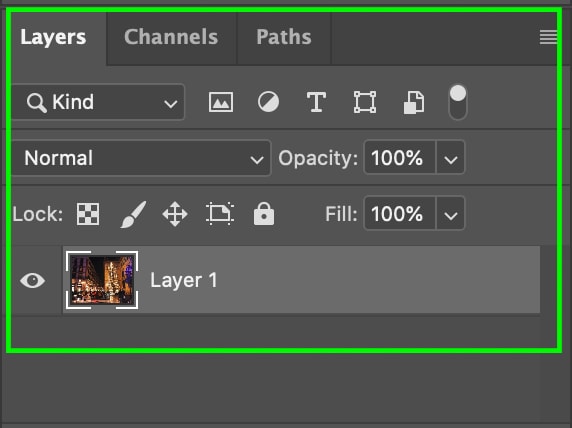
Then click the layer(s) you'd similar to re-create. Y'all can too concur Command or Control (Mac/PC) tin can select multiple layers at once. You can then indistinguishable the layer by dragging it to the New Layer push.

It volition now appear named the same as your original layer + "re-create". To rename your new layer, double-click the name and add a new one, similar to renaming a file on your figurer.

Another way of creating a layer copy is to right-click the layer or the thumbnail and select Duplicate Layer.

These methods will chop-chop and easily indistinguishable a layer without naming information technology. However, if you'd similar to duplicate and proper noun your new layer before duplication, head to Layer > Duplicate Layer.
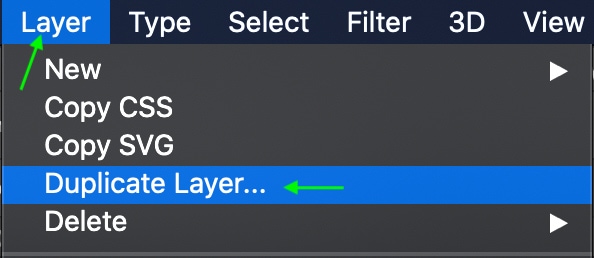
In the window that appears, you lot can proper name the layer and click OK, and you'll come across the duplicated layer in the layers console.

How To Re-create Selections
To copy the contents of a selection in Photoshop, starting time, create a option with your selection tool of option. With the selection agile, press Command + C (Mac) or Control + C (PC) to copy the selection contents. To paste the contents in a new location, press Control + Five (Mac) or Control + V (PC).
Now lets' break this downwards more than in-depth, also as discuss an alternating method.
As I mentioned, you must start make your selection of the area y'all want to copy using any of the selection tools. I used the Lasso tool, which makes freehand selections.


Now, you can copy and paste the selection past using Command + C (Mac) or Control + C (PC) and paste using Command + P (Mac) or Control + P (PC). The selection will appear as a new layer in your layers panel. If you wanted to salvage the actual selection to paste onto another image, you lot would need to use what's known as an Alpha Channel.

The 2nd method allows you to copy a selection and elevate it effectually your projection, or even move it between projects. This method will as well salvage retentivity as you won't be using the clipboard.
To do this, first, make your selection. So, select the Move tool. You lot tin can also temporarily activate the Motility tool by holding Command (Mac) or Command (PC).

With the Motion tool agile, concord down Pick (Mac) or Alt (PC) and elevate the selected area you'd like to copy to the place in your project you'd like information technology pasted.
To paste in a different project, drag the selection to the window of the new project. Make sure you hold Alt or Pick during the entire moving process. The new window tab should plough low-cal greyness and open once your cursor hovers over the tab. You lot tin and then motion the selection around and place it on the new projection.

When moving a selection to a new projection, you'll notice that the choice and the projection may accept different resolutions. This happens because the pasted option volition keep the aforementioned resolution as the project it came from. Earlier copying the selection it may be worthwhile to go to Image > Image Size to change the resolution of the destination projection to match the source project.


How To Copy & Paste Photographic camera Raw Settings
Photographic camera Raw adjustment settings can be quickly copied and pasted betwixt multiple images by beginning pressing Command + C (Mac) or Control + C (PC) to copy the adjustments. Then select your side by side image and press Command + 5 (Mac) or Control + 5 (PC) to paste the adjustments.
If keyboard shortcuts aren't your thing, there is another way to copy and paste your settings in Camera Raw.
First, open a RAW file into Photoshop to brand Camera Raw automatically open up. If you are working with an prototype already inside of Photoshop, get to Filter > Camera Raw Filter. Now make whatsoever adjustments to the photo that you lot'd like to re-create and utilise to another. Once you're happy with the settings, head to the toolbar on the right and click the settings icon, which looks like an ellipsis.

From here, click Re-create Edit Settings. You tin can too practice this with Command + C (Mac) or Control + C (PC).

Side by side, click Open. Once you're back in Photoshop, open up upwards a new raw file, the one y'all'd like to paste the settings on. In the Photographic camera Raw window that appears, get back to the ellipsis icon and click Paste Edit Settings. You can as well apply Command + V (Mac) or Control + V (PC).

The settings on this new image will friction match that of the outset image. This is especially useful when working with multiple photos that demand the aforementioned edits. Copying and pasting Camera Raw edits saves fourth dimension and steps.
To assistance save time, be sure to select multiple RAW images for import from your estimator. That way they appear in the aforementioned Camera Raw window and you tin can select the next epitome to paste your settings a bit faster.
How To Copy & Paste Adjustments Between Projects
In that location may exist times when yous'd similar to apply the same adjustments to different projects. First, open the two projects you'd like to apply, and make the adjustments to ane of the projects. Yous can add adjustments using the Adjustments panel so they show up as private adjustment layers.

Now in the layers panel, click the adjustment layer(s) you lot'd like to copy and paste. If y'all'd similar to copy more than 1 adjustment layer, hold Control/Control as you select the layers.

The easiest manner to copy these from ane projection to another is to drag them. Make sure the move tool (V) is activated, and with the adjustment layer(s) selected, drag them to the other project tab that y'all'd like to re-create them to. You tin can leave them on the projection or drag them to the layers panel, either fashion, they will show upwards in the layers panel with the same names equally in the original project.
How To Copy Layer Styles To Some other Layer
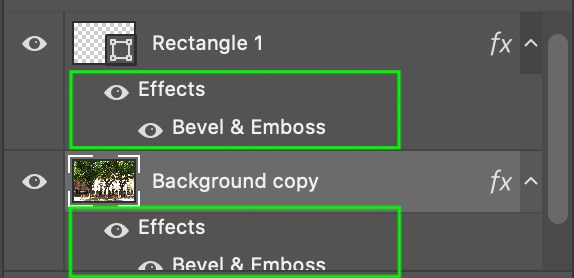
When you're working with layer styles, you lot can also copy and paste your layer effects onto other layers to relieve time. This is an easy fox that prevents you from having to go through all the steps of adding the same furnishings manually to some other layer.
After you lot've applied a layer styles effect, simply hover over the "fx" icon to the correct of the layer, and press Pick (Mac) or Alt (PC) as you elevate this icon to the other layer. Information technology is of import to press Choice or Alt, as it copies the styles; if you don't, it will take the fashion from one layer and move it to the other.

In one case dropped on the new layer, both layers will appear with the same styles applied.
You can rename them by double-clicking the outcome name and typing a new one.
As you can see, there are many different ways to copy and paste in Photoshop. Using the different copy and paste methods will salvage y'all time and speed upwardly your overall workflow.
Happy Editing!
Source: https://www.bwillcreative.com/how-to-copy-and-paste-in-photoshop/
Posted by: hannahexis1960.blogspot.com
0 Response to "How To Copy A Selected Area In Photoshop"
Post a Comment